Sulfated Glycan Array

10620

From: $994.00

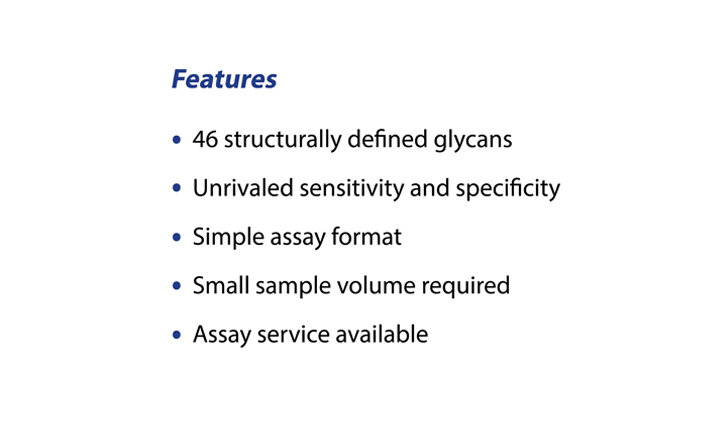
The Sulfated Glycan Array provides researchers with a powerful tool to study the interactions between sulfated glycans and a wide range of biological samples, such as proteins, antibodies, cell lysates, serum, vesicles, bacteria, or viral particles. This innovative array features 46 structurally-defined glycans, including paired sulfated glycans and their non-sulfated counterparts. The glycan repertoire includes diverse types such as O-glycans, O-mannose glycans, and various small glycan motifs, offering a comprehensive platform for sulfated glycan-binding studies.

Each array is equipped with 8 or 16 identical subarrays, enabling the simultaneous analysis of multiple samples. Results can be generated within hours, facilitating quick and efficient exploration of sulfated glycan interactions. Assay services are available upon request to support your experimental goals.

SKU: 10620 Category:
Description
Structures
Examples
Document

Description

Introduction
Sulfated glycans are a distinct class of sugar molecules characterized by the addition of sulfate groups to their structures. These modifications play crucial roles in a variety of biological processes, including cellular communication, immune response, and the regulation of signaling pathways. Sulfated glycans are especially known for their ability to mediate interactions with proteins, such as lectins and growth factors, influencing key physiological and pathological processes. For instance, sulfated glycans have been implicated in modulating inflammation, inhibiting viral entry, and regulating tumor progression.

The biological activities of sulfated glycans are often linked to their specific structural motifs, which include the arrangement of monosaccharides, linkage types, and sulfate group positions. These motifs determine the binding affinity and specificity of sulfated glycans toward various biological targets. Due to their importance, sulfated glycans have been investigated as biomarkers for diseases and as therapeutic targets for drug development. Moreover, paired comparisons of sulfated glycans with their non-sulfated forms provide valuable insights into the functional roles of sulfation in glycan activity.

ZBiotech has developed a robust Sulfated Glycan Array to explore the interactions between sulfated glycans and various biological samples, such as proteins, antibodies, cells, cell lysates, serum, vesicles, bacteria, or viral particles. The array features 46 structurally-defined glycans, including paired sulfated glycans and their non-sulfated counterparts. Each slide contains 8 or 16 identical subarrays, allowing for the simultaneous analysis of multiple samples. Results can be obtained in just a few hours, making the study of glycan-binding interactions efficient and accessible. The Sulfated Glycan Array delivers high-throughput, reliable data and can be customized to meet specific research needs. Assay services are also available upon request.

Handling and Storage

Store the bag of slides and any buffers in a 4°C refrigerator if they are to be assayed within 3 weeks upon receipt. For long term storage keep the bag of slides at -20°C. Avoid freezing and thawing multiple times. Purchased slides and buffers should be used within 6 months.

Allow the bag of slides to equilibrate to room temperature at least 20 minutes before opening. After opening, re-seal any unused slides in the moisture barrier bag with a desiccant inside and refreeze.

Array Map/Schematic

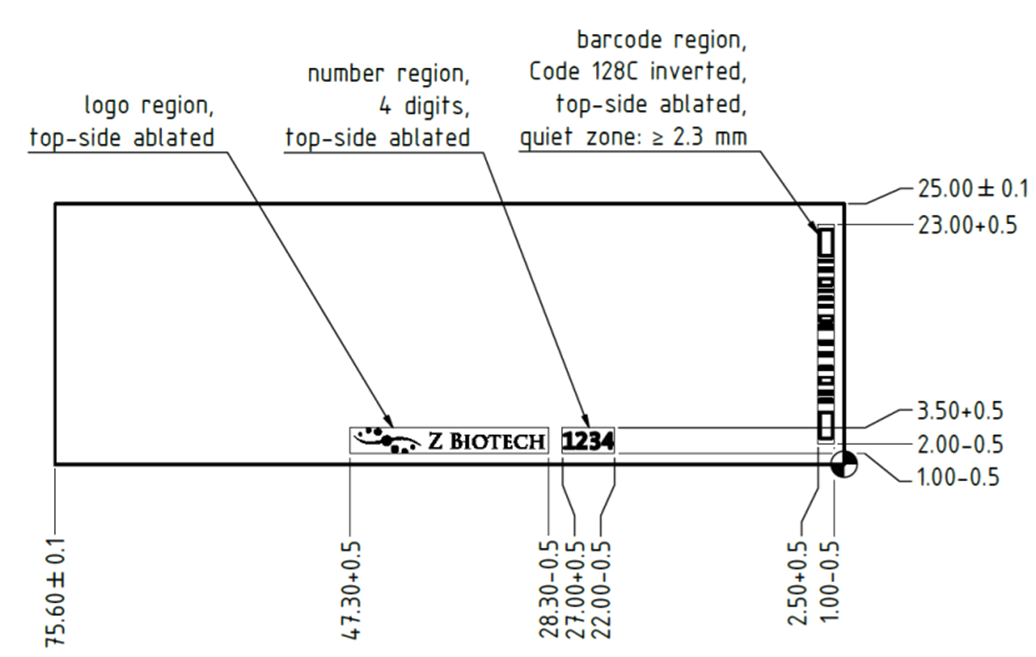
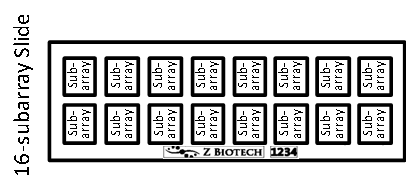
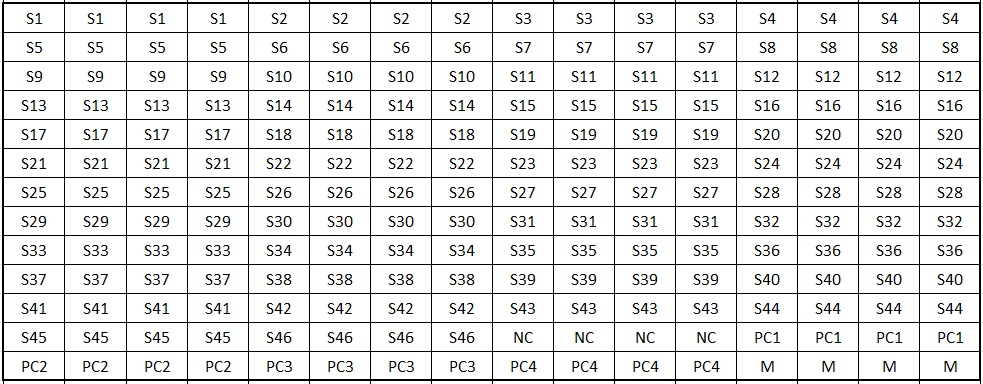
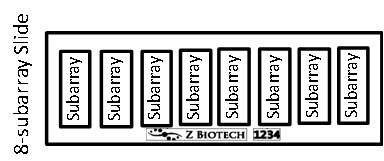
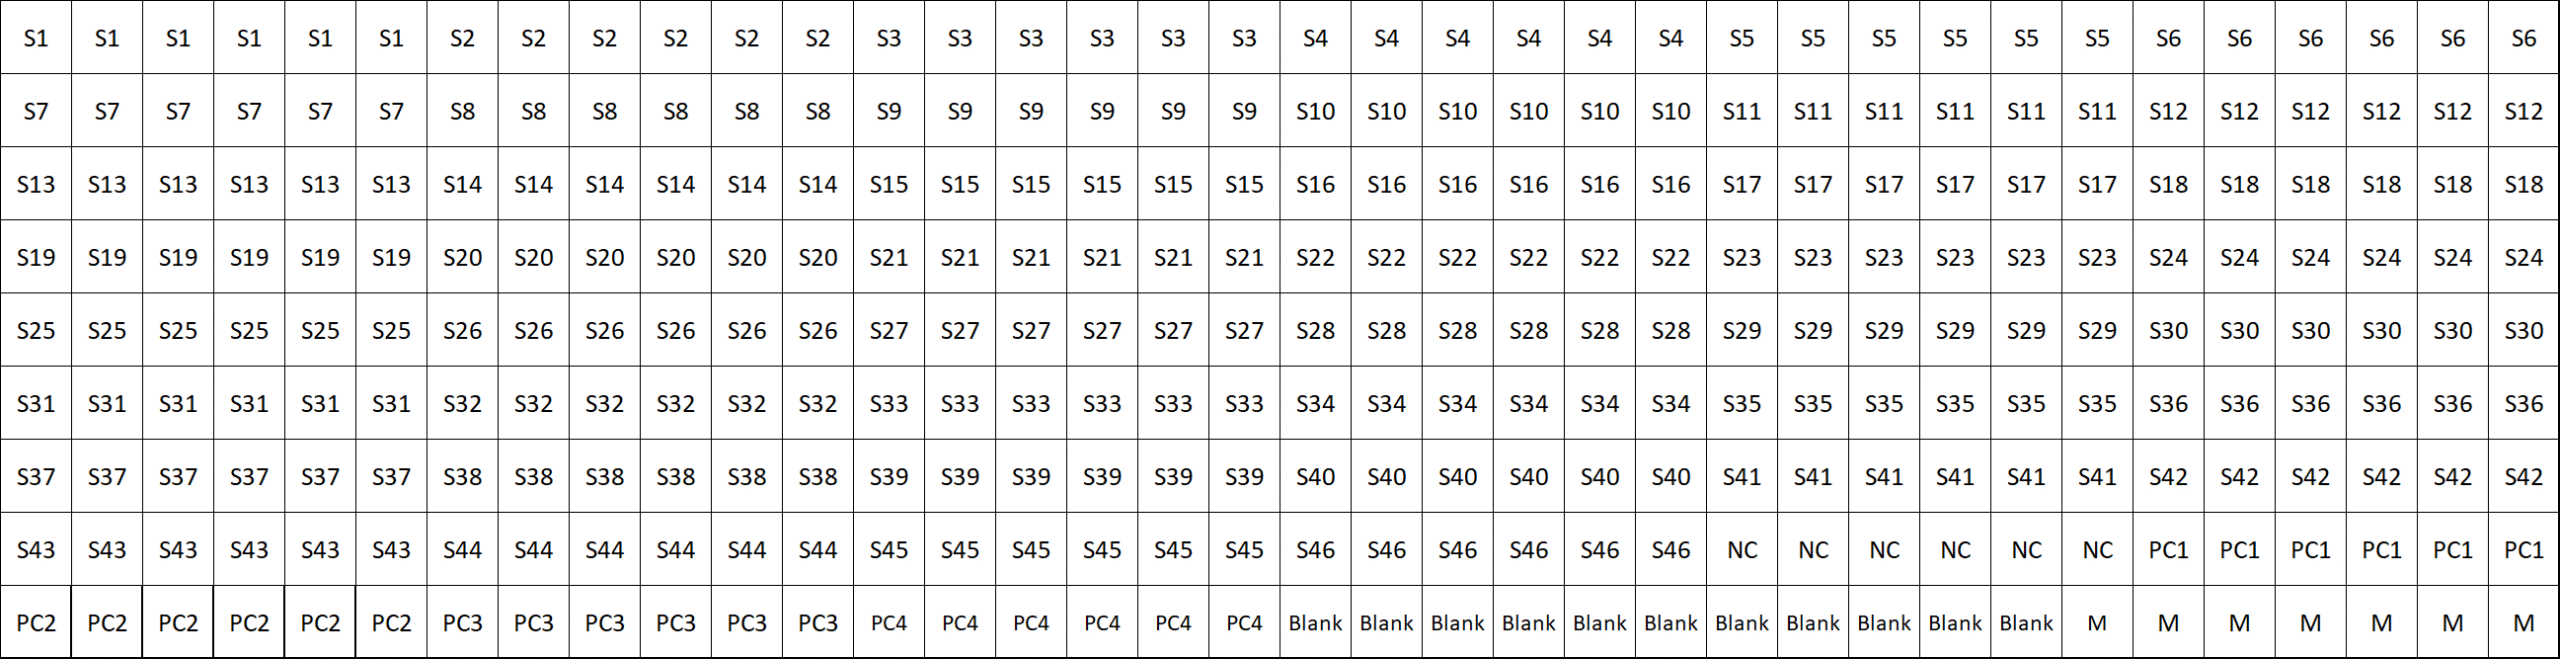
Glycosaminoglycan Microarray slides have either 8 or 16 subarrays. Arrays are printed on the side with the “Z Biotech” label and 4-digit number ID facing upward. The “Z Biotech” label is located on the bottom center from a landscape view. The number ID is consistent with the barcode ID on the bottom from a portrait view. Dimensions and array maps are shown below.

Array Map (16-subarray slides):

Controls

    NC: Negative control, Print Buffer
    PC1: Positive control 1, a biotinylated probe (0.01 mg/ml)
    PC2: Postitive control 2, Human IgG (0.1 mg/ml)
    PC3: Postitive control 3, Mouse IgG (0.1 mg/ml)
    PC4: Postitive control 4, Rabbit IgG (0.1 mg/ml)
    Array Marker (M): Streptavidin-Cy3 (0.01 mg/ml) and Streptavidin-Cy5 (0.01 mg/ml)
Array Map (8-subarray slides):

Controls

    NC: Negative control, Print Buffer
    PC1: Positive control 1, a biotinylated probe (0.01 mg/ml)
    PC2: Postitive control 2, Human IgG (0.1 mg/ml)
    PC3: Postitive control 3, Mouse IgG (0.1 mg/ml)
    PC4: Postitive control 4, Rabbit IgG (0.1 mg/ml)
    Array Marker (M): Streptavidin-Cy3 (0.01 mg/ml) and Streptavidin-Cy5 (0.01 mg/ml)

Structures

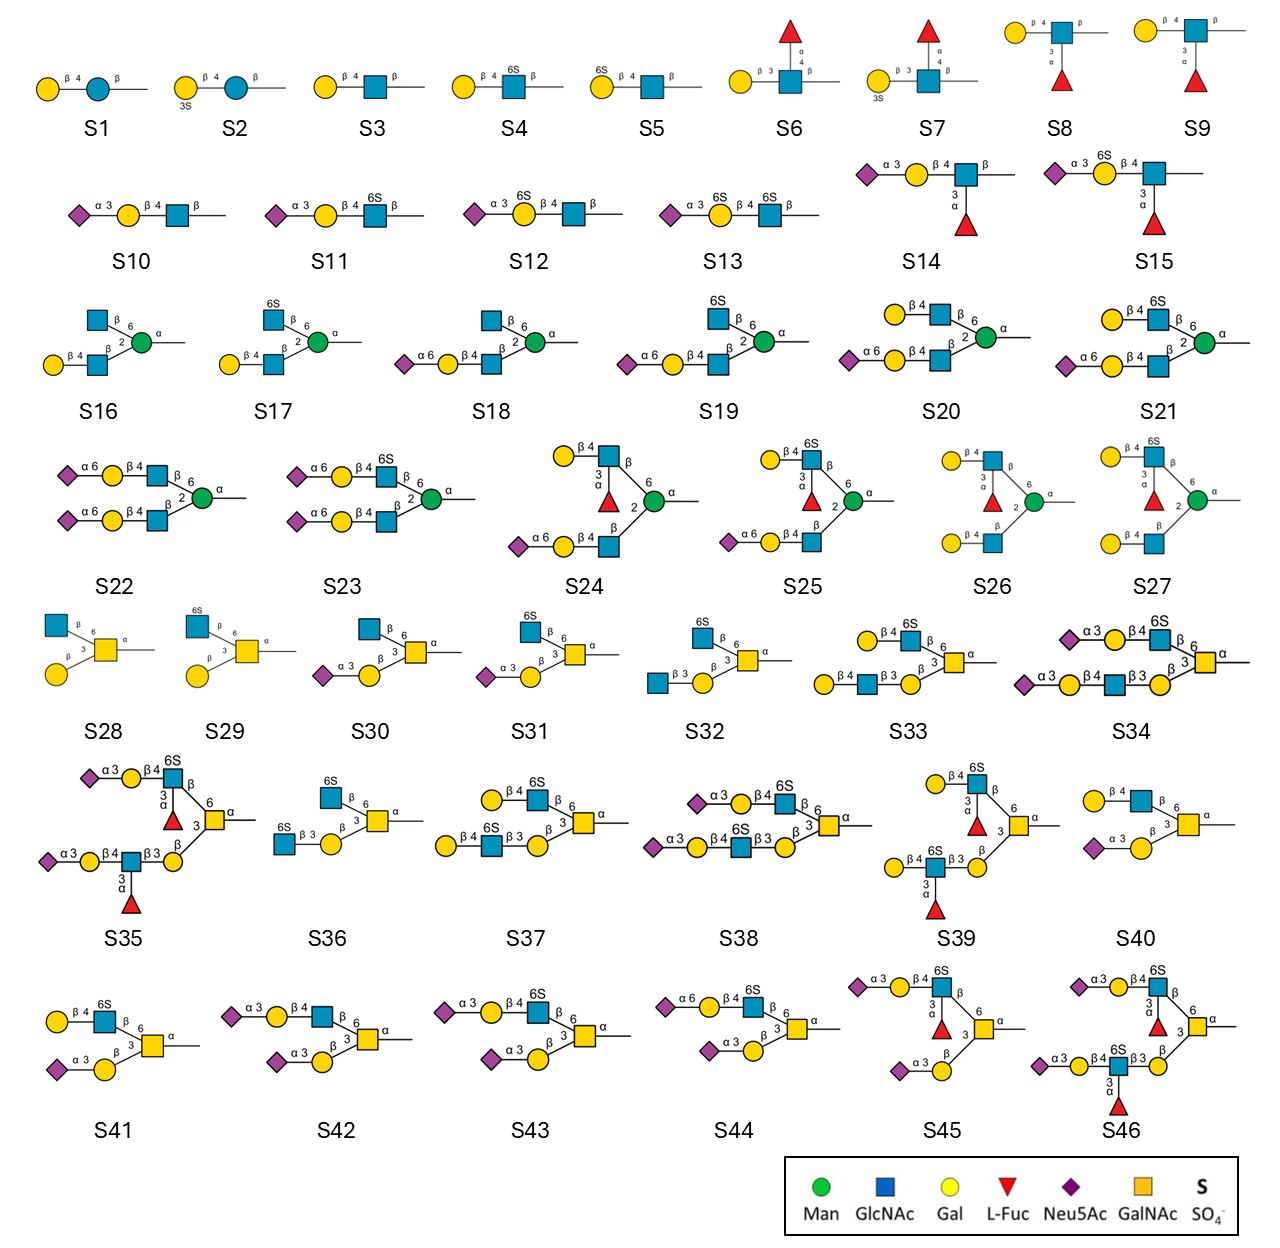
Sulfated Glycan Array SNFG Structures:

ID Structure
S1 Galβ1-4Glcβ
S2 (3S)Galβ1-4Glcβ
S3 Galβ1-4GlcNAcβ
S4 Galβ1-4(6S)GlcNAcβ
S5 (6S)Galβ1-4GlcNAcβ
S6 Galβ1-3(Fucα1-4)GlcNAcβ
S7 (3S)Galβ1-3(Fucα1-4)GlcNAcβ
S8 Galβ1-4(Fucα1-3)GlcNAcβ
S9 (3S)Galβ1-4(Fucα1-3)GlcNAcβ
S10 Neu5Acα2-3Galβ1-4GlcNAcβ
S11 Neu5Acα2-3Galβ1-4(6S)GlcNAcβ
S12 Neu5Acα2-3(6S)Galβ1-4GlcNAcβ
S13 Neu5Acα2-3(6S)Galβ1-4(6S)GlcNAcβ
S14 Neu5Acα2-3Galβ1-4(Fucα1-3)GlcNAcβ
S15 Neu5Acα2-3(6S)Galβ1-4(Fucα1-3)GlcNAc
S16 GlcNAcβ1-6(Galβ1-4GlcNAcβ1-2)Manα
S17 (6S)GlcNAcβ1-6(Galβ1-4GlcNAcβ1-2)Manα
S18 GlcNAcβ1-6(Neu5Acα2-6Galβ1-4GlcNAcβ1-2)Manα
S19 (6S)GlcNAcβ1-6(Neu5Acα2-6Galβ1-4GlcNAcβ1-2)Manα
S20 Galβ1-4GlcNAcβ1-6(Neu5Acα2-6Galβ1-4GlcNAcβ1-2)Manα
S21 Galβ1-4(6S)GlcNAcβ1-6(Neu5Acα2-6Galβ1-4GlcNAcβ1-2)Manα
S22 Neu5Acα2-6Galβ1-4GlcNAcβ1-6(Neu5Acα2-6Galβ1-4GlcNAcβ1-2)Manα
S23 Neu5Acα2-6Galβ1-4(6S)GlcNAcβ1-6(Neu5Acα2-6Galβ1-4GlcNAcβ1-2)Manα
S24 Galβ1-4(Fucα1-3)GlcNAcβ1-6(Neu5Acα2-6Galβ1-4GlcNAcβ1-2)Manα
S25 Galβ1-4(Fucα1-3)(6S)GlcNAcβ1-6(Neu5Acα2-6Galβ1-4GlcNAcβ1-2)Manα
S26 Galβ1-4(Fucα1-3)GlcNAcβ1-6(Galβ1-4GlcNAcβ1-2)Manα
S27 Galβ1-4(Fucα1-3)(6S)GlcNAcβ1-6(Galβ1-4GlcNAcβ1-2)Manα
S28 GlcNAcβ1-6(Galβ1-3)GalNAcα
S29 (6S)GlcNAcβ1-6(Galβ1-3)GalNAcα
S30 GlcNAcβ1-6(Neu5Acα2-3Galβ1-3)GalNAcα
S31 (6S)GlcNAcβ1-6(Neu5Acα2-3Galβ1-3)GalNAcα
S32 (6S)GlcNAcβ1-6(GlcNAcβ1-3Galβ1-3)GalNAcα
S33 Galβ1-4(6S)GlcNAcβ1-6(Galβ1-4GlcNAcβ1-3Galβ1-3)GalNAcα
S34 Neu5Acα2-3Galβ1-4(6S)GlcNAcβ1-6(Neu5Acα2-3Galβ1-4GlcNAcβ1-3Galβ1-3)GalNAcα
S35 Neu5Acα2-3Galβ1-4(Fucα1-3)(6S)GlcNAcβ1-6(Neu5Acα2-3Galβ1-4(Fucα1-3)GlcNAcβ1-3Galβ1-3)GalNAcα
S36 (6S)GlcNAcβ1-6((6S)GlcNAcβ1-3Galβ1-3)GalNAcα
S37 Galβ1-4(6S)GlcNAcβ1-6(Galβ1-4(6S)GlcNAcβ1-3Galβ1-3)GalNAcα
S38 Neu5Acα2-3Galβ1-4(6S)GlcNAcβ1-6(Neu5Acα2-3Galβ1-4(6S)GlcNAcβ1-3Galβ1-3)GalNAcα
S39 Galβ1-4(Fucα1-3)(6S)GlcNAcβ1-6(Galβ1-4(Fucα1-3)(6S)GlcNAcβ1-3Galβ1-3)GalNAcα
S40 Galβ1-4GlcNAcβ1-6(Neu5Acα2-3Galβ1-3)GalNAcα
S41 Galβ1-4(6S)GlcNAcβ1-6(Neu5Acα2-3Galβ1-3)GalNAcα
S42 Neu5Acα2-3Galβ1-4GlcNAcβ1-6(Neu5Acα2-3Galβ1-3)GalNAcα
S43 Neu5Acα2-3Galβ1-4(6S)GlcNAcβ1-6(Neu5Acα2-3Galβ1-3)GalNAcα
S44 Neu5Acα2-6Galβ1-4(6S)GlcNAcβ1-6(Neu5Acα2-3Galβ1-3)GalNAcα
S45 Neu5Acα2-3Galβ1-4(Fucα1-3)(6S)GlcNAcβ1-6(Neu5Acα2-3Galβ1-3)GalNAcα
S46 Neu5Acα2-3Galβ1-4(Fucα1-3)(6S)GlcNAcβ1-6(Neu5Acα2-3Galβ1-4(Fucα1-3)(6S)GlcNAcβ1-3Galβ1-3)GalNAcα

Controls

  • NC: Negative control, Print Buffer
  • PC1: Positive control 1, a biotinylated probe (0.01 mg/ml)
  • PC2: Postitive control 2, Human IgG (0.1 mg/ml)
  • PC3: Postitive control 3, Mouse IgG (0.1 mg/ml)
  • PC4: Postitive control 4, Rabbit IgG (0.1 mg/ml)
  • Array Marker (M): Streptavidin-Cy3 (0.01 mg/ml) and Streptavidin-Cy5 (0.01 mg/ml)

Materials Required

  • Arrayed glass slides
  • 16 or 8 cassettes
  • Glycan Array Blocking Buffer (GABB, Item #10106), add 1% BSA (10 mg/ml) if needed
  • Glycan Array Assay Buffer (GAAB, Item #10107), add 1% BSA (10 mg/ml) if needed
  • Laser fluorescence scanner (able to scan at the wavelength of your fluorophore)
  • Coplin jar
  • Adhesive slide cover film

Preparation of assay samples:
Prepare glycan-binding protein samples or secondary antibodies of interest in a centrifuge tube by diluting with the Glycan Array Assay Buffer. We recommend a range of 50 μg/ml to 0.1 μg/ml concentration for protein samples, although some experimentation may be required to establish the concentration that will provide the highest binding signals with the lowest background fluorescence. This is often accomplished by applying a different dilution of samples to different wells of the array. For the fluorescently labelled streptavidin we recommend a concentration of 1 μg/mL. Calculate the volume of sample needed depending on how many slides and subarrays are to be assayed. We recommend using 100 μL volume of sample per well for 16 subarray cassettes and 200 μL for 8 subarray cassettes to ensure full and even coverage of the printed area throughout incubation for every step of the assay . If necessary, the assay can be done successfully with a minimal volume of 60 μL per well for 16 subarray cassettes and 80 μL for 8 subarray cassettes. We caution that using a minimal volume in the wells has an increased risk of the array drying out during the assay and may also cause unequal distribution of the sample across the arrayed surface which may result in signal variation. Please ensure each sample is homogeneous and thoroughly mixed.

Assay Protocol

Considerations Before Starting the Experiment

1. Preparation of Buffers:

    • Ensure that Glycan Array Blocking Buffer (GABB) and Glycan Array Assay Buffer (GAAB) are ready for glycan microarray analysis.

    2. BSA Addition:

    • If needed, add BSA to GAAB or LAAB to reduce non-specific binding.
    • Prepare a 1% BSA assay buffer by adding BSA to GAAB or LAAB and filter through a 0.2 μm PVDF membrane filter.

    3. Avoiding Dryness:

    • The array surface is extremely sensitive to dryness. Ensure the array does not dry at any point during the assay.
    • Avoid handling multiple subarrays simultaneously to prevent drying out.

    4. Array Formats and Volumes:

    • Common array formats: 8, 16, or 24 subarrays.
      • For 8-subarray format: Use 200 µL per subarray.
      • For 16-subarray format: Use 100 µL per subarray.
      • For 24-subarray format: Use 50-80 µL per subarray.
    • Minimal volumes: 60 µL per well for 16-subarray cassettes and 80 µL per well for 8-subarray cassettes.
    • Caution: Using minimal volumes increases the risk of drying out and may cause signal variation. Ensure samples are homogeneous and thoroughly mixed.

    5. Sample Preparation:

    • Dilute glycan-binding protein samples or secondary antibodies in Glycan Array Assay Buffer.
    • Recommended concentration range for protein samples: 50 μg/mL to 0.1 μg/mL. Experiment to find the optimal concentration for highest binding signals with the lowest background.
    • For fluorescently labeled streptavidin, use a concentration of 0.2 μg/mL.

    6. Storage of Microarray Slides and Buffers:

    • Store microarray slides and buffers at 4°C if assayed within 24 hours of receipt.
    • For long-term storage, keep microarray slides at -20°C. Avoid multiple freeze-thaw cycles.
    • Use slides and buffers within 12 months. Allow slides to equilibrate to room temperature for at least 20 minutes before opening.
    • After opening, reseal unused slides in a moisture barrier bag with a desiccant and refreeze. Handle slides in a dust-free environment, wearing gloves and holding slides by the edges.
    • When adding samples, avoid touching the pipette tip to the array surface. When removing samples, gently touch the pipette tip to the corner of the well and tip the slide.

    Analyzing Biological Samples with Glycan Microarray

    Part 1: Blocking

    Handle the slide in a clean, dry environment. Use gloves and avoid touching the slide surface.

    1. Let the microarray slide equilibrate to room temperature (20-30 minutes) before opening the moisture barrier bag.
    2. Assemble the slide into a hybridization chamber device.
    3. Add the Glycan Array Blocking Buffer (GABB) to each subarray well of the assembled hybridization chamber device:

    • 100 μL for each subarray of a 16-subarray chamber device
    • 200 μL for each subarray of an 8-subarray chamber device

    4. Cover the hybridization chamber device with adhesive film to prevent evaporation and incubate the slide on a shaker at 80 rpm for 30 minutes. Ensure the orbital shaker is completely flat to avoid variations in binding and detection. Longer incubation times are acceptable but not necessary.
    5. After 30 minutes, add 100 μL of Glycan Array Assay Buffer (GAAB) to each subarray well of a 16-subarray chamber device (or 200 μL of GAAB to each subarray well of an 8-subarray chamber device). Aspirate the liquid out from each well, ensuring that some liquid remains to cover the surface.
    6. Add another 100 μL of GAAB to each subarray well of a 16-subarray chamber device (or 200 μL of GAAB to each subarray well of an 8-subarray chamber device). Incubate at room temperature for 5 minutes at 80 rpm on a shaker.
    7. After incubation, aspirate all the liquid out from each well. Then add 100 μL of GAAB to each subarray well of a 16-subarray chamber device (or 200 μL of GAAB to each subarray well of an 8-subarray chamber device). Incubate at room temperature for 5 minutes at 80 rpm on a shaker.
    8. After incubation, aspirate all the liquid out from each well. Then add 100 μL of GAAB to each subarray well of a 16-subarray chamber device (or 200 μL of GAAB to each subarray well of an 8-subarray chamber device). Incubate at room temperature for 5 minutes at 80 rpm on a shaker.

    Part 2: Binding Assay

    1.Unless the glycan-binding protein sample of interest is bacteria or cells, centrifuge samples briefly to avoid adding irrelevant particles to the array.
    2.Remove the blocking buffer from each well by gently touching a pipette tip to the corner of the well. We recommend doing this one subarray at a time, not handling multiple subarrays simultaneously to avoid drying out the microarray slide surface.
    3.Immediately apply the glycan-binding protein sample of interest to each well.
    4.Seal the wells with adhesive film to prevent evaporation. If the sample is fluorescently labeled, cover it with aluminum foil to keep it in the dark.
    5.Incubate on the shaker for 1 hour at 80 rpm. Longer incubation times may increase the binding signal, especially for weakly binding samples. Avoid allowing the slides to dry out at any point during the assay, especially during long incubation times. Make sure the adhesive film is sealed around each well.
    6.If your glycan-binding protein samples are fluorescently labeled, go directly to Part 6 – Final Wash and Dry.

    Part 3: Wash

    We recommend doing the following procedure using a multi-channel pipette.

    1. Initial Wash:

    • After incubating the samples for 1 hour at room temperature, use a multi-channel pipette to add 100 μL of Glycan Array Assay Buffer (GAAB) to each subarray well of a 16-subarray chamber device (or 200 μL of GAAB to each subarray well of an 8-subarray chamber device).
    • Aspirate the liquid out using a multi-channel aspirating needle device from each well, ensuring not all the liquid is aspirated out, leaving enough liquid to cover the surface.
    • Repeat the addition and aspiration of GAAB three times. For each repetition, add 100 μL (or 200 μL for an 8-subarray device) of GAAB, aspirate, and ensure some liquid remains to cover the surface. Incubate at room temperature for 5 minutes at 80 rpm on a shaker.

    2. Subsequent Washes:

    • After the initial wash and incubation, aspirate all the liquid out from each well using a multi-channel aspirating needle device.
    • Add 100 μL of GAAB to each subarray well of a 16-subarray chamber device (or 200 μL of GAAB to each subarray well of an 8-subarray chamber device).
    • Incubate at room temperature for 5 minutes at 80 rpm on a shaker.

    3. Final Wash:

    • After the second incubation, aspirate all the liquid out from each well using a multi-channel aspirating needle device.
    • Add 100 μL of GAAB to each subarray well of a 16-subarray chamber device (or 200 μL of GAAB to each subarray well of an 8-subarray chamber device).
    • Incubate at room temperature for 5 minutes at 80 rpm on a shaker.

    4. Proceed to the Next Step:

    • If your glycan-binding sample is biotinylated, go directly to Part 5 – Fluorescent Staining.

    Part 4: Binding of Biotinylated Antibody (Sandwich Assay Format)
    1. Adding Secondary Antibody:

    • After removing all the GAAB using a multi-channel aspirating needle device, immediately add the secondary biotinylated antibody to each well using a multi-channel pipette.

    2. Incubation:

    • Seal the wells with adhesive film and incubate on the shaker for 1 hour at 80 rpm. Longer incubation times are acceptable but not necessary.

    Part 5: Fluorescent Staining
    1. Adding Streptavidin:

    • After completely removing the GAAB using a multi-channel aspirating needle device, immediately add the fluorescently labeled streptavidin sample using a multi-channel pipette.

    2.Incubation:

    • Seal the wells with adhesive film and shield the wells from light with aluminum foil. Incubate on the shaker at 80 rpm for 1 hour. Longer incubation times are acceptable but not necessary.

    Part 6: Final Wash and Dry
    1. Initial Wash:

    • After incubating the secondary antibody or streptavidin for 1 hour at room temperature, use a multi-channel pipette to add 100 μL of GAAB to each subarray well of a 16-subarray chamber device (or 200 μL of GAAB to each subarray well of an 8-subarray chamber device).
    • Aspirate the liquid out using a multi-channel aspirating needle device from each well, ensuring not all the liquid is aspirated out, leaving enough liquid to cover the surface.
    • Repeat the addition and aspiration of GAAB three times. For each repetition, add 100 μL (or 200 μL for an 8-subarray device) of GAAB, aspirate, and ensure some liquid remains to cover the surface. Incubate at room temperature for 5 minutes at 80 rpm on a shaker.

    2. Subsequent Washes:

    • After the initial wash and incubation, aspirate all the liquid out from each well using a multi-channel aspirating needle device.
    • Add 100 μL of GAAB to each subarray well of a 16-subarray chamber device (or 200 μL of GAAB to each subarray well of an 8-subarray chamber device).
    • Incubate at room temperature for 5 minutes at 80 rpm on a shaker.

    3. Final Wash:

    • After the second incubation, aspirate all the liquid out from each well using a multi-channel aspirating needle device.
    • Add 100 μL of GAAB to each subarray well of a 16-subarray chamber device (or 200 μL of GAAB to each subarray well of an 8-subarray chamber device).
    • Incubate at room temperature for 5 minutes at 80 rpm on a shaker.

    4. Disassembling the Hybridization Chamber:

    • Disassemble the hybridization chamber device from the slide. For the provided cassette, this can be done by holding the slide with one hand at the top and bottom edges and sliding out the cassette clips one by one with the other hand. If your provided cassette has metal clips, they can be removed by rotating the clip outwards from the bottom of the slide. When the clips have been removed, place the slide on the table and hold a small outer edge of the slide to the table as you gently peel the cassette off.

    5.Immersing the Slide:

    • Immediately immerse the slide in a Coplin jar full of GAAB. Do not touch the surface of the array or allow the array surface to touch the sides of the beaker or jar. Place the jar or beaker on a shaker at 80 rpm for 10 minutes.

    6. Rinsing with Water:

    • Decant the buffer from the jar while holding the slide in place (only touch the edge of the slide) and then add sterile de-ionized water to immerse the slide. Place the jar on the shaker at 80 rpm for 5 minutes.

    7. Repeat Rinsing:

    • Decant the water from the jar. Repeat once more with fresh de-ionized water.

    8. Drying the Slide:

    • Allow the slide to dry by using a microarray slide centrifuge completely in a clean, dust-free environment before scanning.

    Part 7: Data Acquisition and Analysis
    1. Scanning the Slide:

    • Scan the slide in a laser fluorescence scanner at the wavelength of emission for the fluorophore used. Adjust the laser power and PMT to obtain the highest possible signals without being saturated (saturated positive control signal is okay).

    2. Analyzing Data:

    • Analyze data with microarray analysis software. If there is specific binding, the signal intensity should be higher than the background signal (the area where there are no printed spots). The fluorescent signal due to specific binding to your sample of interest should be dose-dependent with your sample dilution (unless the sample concentration range is too high and glycan-binding is saturated) and should have a positive binding signal after the signal from control assays has been subtracted.

    3. Quantifying Signal Intensities:

    • Our standard method of comparing signal intensities is to quantify the median signal intensity data and subtract the background intensity. Subtracting signals from negative control spots as well as the same spots on a negative control assay (assay with only detection antibodies and fluorophore) will give more accurate specific binding data.

    4. Interpreting Control Signals:

    • Negative Control (Print Buffer): The negative control should produce a signal close to the intensity of the background. Since there is no binding involved with the negative control, any other signals around the negative control’s intensity are also not binding.
    • Marker: The array marker should show a fluorescence signal regardless of the assay. It is there primarily to aid with the orientation of the array map during analysis.
    • Biotinylated Mannose (PC1): This positive control will bind directly to the fluorescent-labeled streptavidin. If your glycan-binding protein sample is already fluorescently labeled, or in any case where the addition of fluorescently labeled streptavidin to the array was not performed (Part 5 – Fluorescent Staining), this positive control will not be reactive.
    • IgG (PC2, PC3, PC4): IgG is an antibody found in the blood that is a primary component of humoral immunity. If the glycan-binding or secondary antibody sample is an anti-IgG from a human, rabbit, or mouse, it should bind to the respective IgG control.

Examples

Typical Binding Assay Result from the Sulfated Glycan Microarray

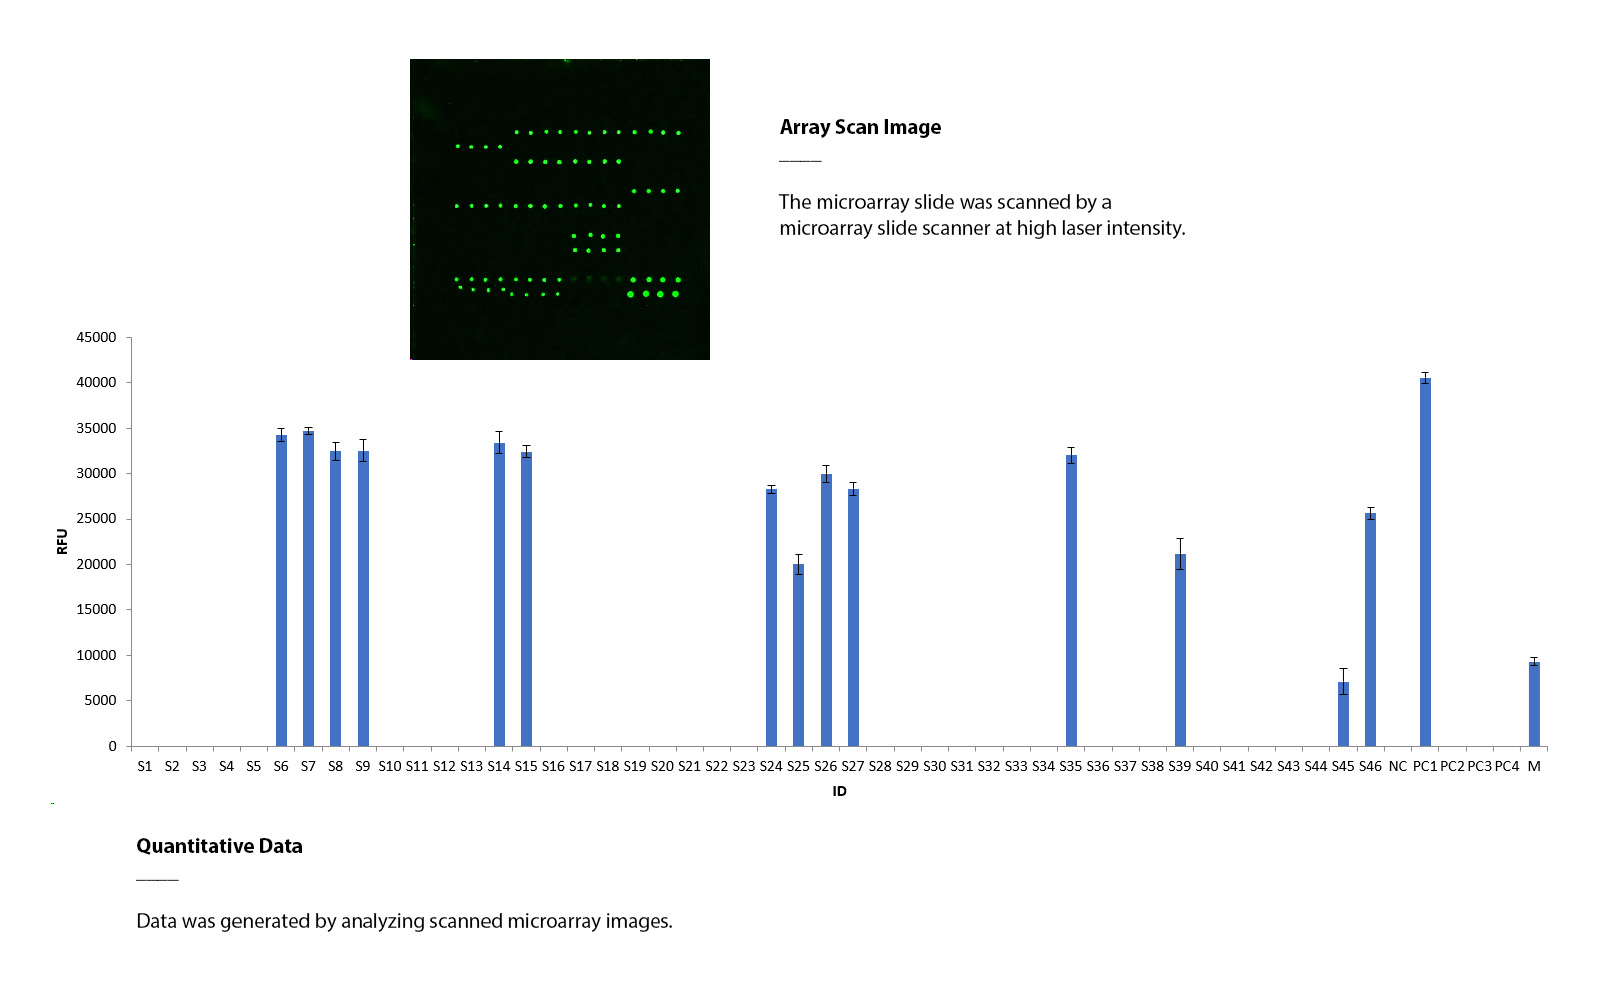
Example 1: Aleuria aurantia lectin (AAL) binds to various sulfated and non-sulfated glycans that contain fucose.

The Sulfated Glycan Array was tested using biotinylated AAL lectin (5 μg/mL), followed by streptavidin-Cy3 (0.2 μg/mL). The array was scanned with a microarray scanner at a wavelength of 532 nm, and the positive controls demonstrated binding signals as expected. AAL exhibited binding to multiple sulfated and non-sulfated glycans with fucose present.

Example 2: Human Siglec-8 and Its Interaction with Sulfated Glycans

Human Siglec-8, a sialic acid-binding immunoglobulin-like lectin, is predominantly expressed on eosinophils and mast cells and plays a significant role in regulating immune responses. It is known to bind selectively to specific glycans, particularly sulfated glycans such as 6′-sulfo-sLex, which contribute to its functional specificity in various physiological and pathological processes, including inflammation and allergy regulation.

The Sulfated Glycan Array was used to investigate the binding interactions of human Siglec-8. The assay utilized the extracellular binding domain of human Siglec-8 fused to an human IgG Fc tag (2.5 μg/mL), followed by detection with anti-human IgG Fc (2.5 μg/mL). Scanning at a wavelength of 532 nm revealed binding signals. Human Siglec-8 exhibited binding to multiple sulfated glycans.

Troubleshooting

Condition Possible Causes Potential Solutions
High Background
  • Concentration of sample of interest is too high
  • Concentration of fluorescent samples is too high
  • Arrays are not thoroughly washed.
  • Slide drying out during assay
  • Excessive particles in the samples due to sample aggregation, dust, etc.
  • Use a lower concentration range of samples. Consider a wider range if you are unsure where the detection limit is. Use control assays to determine which sample is causing high background.
  • Apply longer times for washing steps and use a higher shaking rate
  • Make sure wash buffer and sample is completely removed before the next step
  • Make sure adhesive film fully seals the wells to avoid evaporation
  • Centrifuge the samples prior to assay to avoid adding irrelevant particles. Make sure buffers are filtered.
  • If you think that the protein is aggregating during incubation, try shaking at a higher speed
Signal Variation
  • Slide drying out during assay
  • Binding samples are not equally distributed in the wells
  • Glycan-binding protein aggregation during incubation
  • Bubbles during incubation
  • Make sure wells are sealed to prevent evaporation during incubation
  • Apply a larger volume of sample to each well to ensure equal distribution
  • Use a higher shaking rate during incubation
  • Make sure samples are homogeneous, mixed thoroughly, and do not leave bubbles on the array surface
Unexpected Binding
  • Cross contamination between wells or other sources
  • Sample contamination
  • Make sure to use sterilized pipette tips and tubes used for sample application and preparation
  • Ensure cassette is pressed firmly to the slide so that there are no gaps to allow leaking between wells
  • Be careful not to cross contaminate samples when applying to the wells, even during wash steps

Document

List of Sulfated glycan structures on the array (download the PDF)

Protocol & User Manual (download the manual)